
To swing the ball consistently, focus first on seam stability and a repeatable, slightly angled release: everything else follows from that. Ball condition and weather set the ceiling on how much you can swing, so match your plan to what’s available. Start with one change: release with an upright seam and a touch of backspin on a good-to-full length.
Key Takeaways
Mastering seam stability and a repeatable release, combined with understanding external conditions and micro-mechanics, enables consistent and effective swing bowling.
| Point | Details |
|---|---|
| Seam stability importance | Consistent seam orientation during release is key to generating reliable swing, especially when conditions favor it. |
| Micro-mechanics | Small adjustments in grip, wrist posture, and release timing drastically influence swing direction and quality. |
| External conditions | Weather, pitch type, and ball condition set hard limits on swing potential, requiring tactical adaptation. |
| Training drills | Use targeted drills like seam checks and slow-motion review to develop and measure swing technique. |
| Consistency in delivery | Balance, run-up rhythm, and release platform are crucial for seam stability and swing accuracy. |
Table of Contents
- What swing actually is and the four types you need to know
- Grip, seam orientation and release: the micro-mechanics that make or break swing
- Run-up, arm path and release platform: keeping the seam upright
- How ball condition, pitch and weather change what’s possible
- Drills and a 30 to 45 minute net session to build swing from scratch
- Common mistakes and quick fixes when the ball won’t swing
- Measuring progress with video, radar and coaching feedback
- Body position and balance during delivery
- Release point timing and follow-through techniques
- Using pace and length variations to complement your swing
- Mental approach and visualisation for consistent swing bowling
- Turning these tips into measurable improvement
- FAQ
- Sources
What swing actually is and the four types you need to know
Swing happens when air flows differently across the two sides of the ball, pushing it sideways through the air before it pitches. The seam acts like a small fence that disrupts smooth airflow on one side while the other stays cleaner, and that pressure difference bends the ball’s path. A recent aerodynamic review describes the seam as acting like a vortex generator, with a laminar separation bubble playing a central role in how the ball curves, which updates a lot of the old folklore about shining one side.
Four distinct types show up across a match, each suited to different conditions and ball ages.
- Conventional swing: the ball moves away from or into the batter early, driven by the seam angle and a shiny new ball, and works best in the first 10 to 15 overs.
- Reverse swing: the ball moves the opposite way to what the seam position suggests, and it tends to appear once the ball is older and one side has roughened significantly.
- Late swing: the ball holds its line for most of its flight and darts only in the last metre or two before the pitch, which is the hardest version for batters to read.
- Contrast swing: deliveries that alternate between conventional and reverse-style movement within the same spell, used to stop batters settling into a pattern.
Late swing deserves special attention because it’s teachable rather than purely a product of ball wear. Research from QUT ePrints found that bowlers who slightly reduce release velocity while increasing seam stability and adding backspin tend to generate more late swing, particularly when they pitch the ball fuller. That’s a trade: you give up a little pace for a seam that holds its shape longer in flight, and the ball swings later and sharper as a result.
Match context matters as much as technique. A hard, true pitch with a breeze helps conventional swing in the opening overs, while a well-maintained but ageing ball on a dry, abrasive surface sets up reverse swing later in the innings. Knowing which type you’re chasing changes your grip, your pace and even your run-up rhythm, so it’s worth deciding before you walk back to your mark rather than hoping it happens.
Grip, seam orientation and release: the micro-mechanics that make or break swing
Everything useful in swing bowling comes down to a handful of small, controllable details at the point of release. Get these right and the aerodynamics do the rest.
For outswing, hold the ball with the seam angled towards the slips, first two fingers either side of the seam and the thumb resting underneath it. For inswing, the same grip rotates so the seam points towards fine leg, with a touch more pressure from the third finger to help rotate the wrist through release. The actual difference between the two is smaller than most bowlers think: three-dimensional motion analysis of elite fast bowlers found statistically measurable differences in grip angle and elbow or hand orientation between inswing and outswing deliveries, but the shifts were subtle rather than dramatic, according to research published in PMC. Small changes in forearm pronation or supination at the point of release can flip the direction the ball swings, which is why elite bowlers often talk about “feel” rather than a textbook grip.
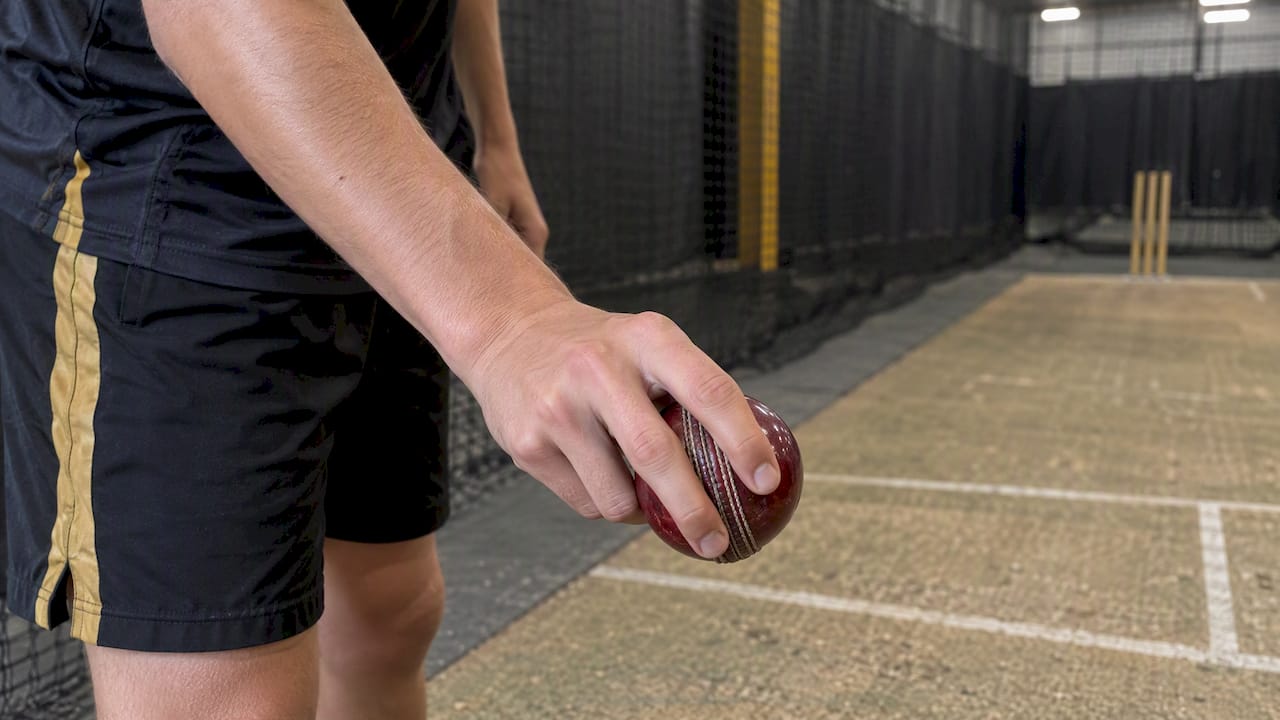
Wrist posture controls whether that seam angle survives the trip down the pitch. A wrist that’s slightly behind the ball at release, rather than side-on, helps impart backspin, and that backspin is doing real mechanical work. Wind-tunnel and particle image velocimetry testing found that backspin rates around 10 revolutions per second help stabilise the seam’s orientation in flight, acting almost like a gyroscope, according to experiments published in MDPI’s Applied Sciences. Without that spin, the seam wobbles, and a wobbling seam presents a different face to the airflow on every rotation, which cancels out the pressure difference that causes swing.
Seam wobble is the single biggest swing-killer for club-level bowlers, and it’s almost always caused by uneven finger pressure at release. If your first finger presses harder than your second, or your third finger clips the ball on the way out, you introduce sidespin that fights the backspin you want. The fix starts with awareness, not a full technique rebuild.
Try these micro-drills in isolation before you take them into a run-up:
- Seam-check drop: stand still, hold the seam upright, and drop the ball from shoulder height onto a mat, watching whether the seam stays vertical on the bounce.
- Wrist-flick release: from a kneeling position, flick the ball into a net from two metres, focusing only on wrist position at release, not pace.
- Finger-pressure isolation: bowl a handful of deliveries with your thumb completely off the ball to feel which two fingers are doing the controlling work.
- Slow-motion seam review: film each of the above on a phone at 120 frames per second and check the seam hasn’t rotated more than a few degrees off vertical by the time it reaches the batter.
Pro Tip: Bowl a few deliveries with your eyes closed just before release, relying purely on grip feel rather than visual correction, to find out how consistent your wrist position really is.
Coaches working with elite swing bowlers tend to resist a single prescribed grip, arguing instead that technique should be built around each bowler’s natural action, with consistent forward momentum and a repeatable release platform mattering more than chasing one “correct” finger position, according to interviews published in the Journal of Sports Sciences. That’s useful permission: if a grip variation feels awkward, it probably won’t survive match pace, no matter how textbook it looks in a mirror.
Run-up, arm path and release platform: keeping the seam upright
A swinging ball is the end product of a chain that starts well before your bowling arm comes over. If your run-up or your base at the crease breaks down, no grip adjustment will save the delivery.
Your run-up’s job is to build momentum you can convert cleanly into pace and rotation, not to maximise speed for its own sake. A rushed, uneven run-up tends to produce a collapsed front leg at the crease, which throws off your hip and shoulder alignment and makes seam position inconsistent from ball to ball. Aim for the same number of strides and the same rhythm every time, building pace gradually rather than sprinting the final few steps.
Arm path has a direct effect on seam stability. A high, over-the-top release tends to keep the seam more vertical for longer, which supports conventional swing, while a lower, round-arm action can introduce natural sidespin that works against a clean seam position, though it occasionally sets up skiddier, low bounce deliveries that suit a different plan. Neither is wrong, but you need to know which one you’re using and bowl to its strengths.
Build release-point consistency with these checks:
- Crease-position drill: bowl six deliveries from close to the stumps, then six from wide on the crease, and compare seam angle on video to see how much your release point shifts naturally.
- Mirror check: shadow-bowl in front of a mirror or a phone propped on a tripod, pausing at the point of release to check shoulder, hip and wrist alignment.
- Front-arm cue: focus on pulling your front arm down hard and early, since a lazy front arm is one of the most common causes of a late, rushed release.
- Video overlay: record deliveries from side-on and stack several frames to check whether your release point drifts over a six-ball over.
Small alignment changes matter more than most bowlers expect. A front foot that lands even a few centimetres outside your usual line changes your hip angle at release, which changes the perceived seam angle the ball presents to the air, and that alone can turn a shaping outswinger into a ball that goes dead straight. Consistency in the run-up and release platform is, in a very real sense, half the battle before grip and wrist work even come into play.
How ball condition, pitch and weather change what’s possible
Swing isn’t only a technique problem. External conditions set hard limits on how much movement is available on a given day, and reading them well changes your tactics more than any grip tweak will.
A new, shiny ball supports conventional swing for roughly the first phase of an innings, and keeping one side as shiny as possible for as long as possible is the single most effective thing a fielding side can do to extend that window. Coaching commentary from Cricket Australia notes that maintaining a shine through careful polishing, combined with keeping the rough side dry, helps conventional swing survive longer into an innings, and that dew or heavy moisture can undo that work quickly by softening the contrast between the two sides.
Reverse swing takes over once the ball is older and wear has roughened one side significantly more than the other. It relies on keeping that contrast sharp: one side shiny, one side rough, with moisture again working against the bowling side, since damp conditions tend to even out the wear and delay or prevent the transition to reverse swing, according to coaching analysis from Cricket Australia. There’s also an ethical line here worth being clear about: legal ball maintenance means polishing with sweat or saliva where permitted and drying the rough side, never artificially roughening the surface.
Pitch type and weather both shift what’s achievable:
- Overcast skies and heavier air tend to assist conventional swing, which is why bowlers often get more shape under cloud cover than on a clear day.
- A hard, grassy surface keeps the ball’s shine intact longer and favours conventional swing into the middle overs.
- A dry, abrasive pitch accelerates wear on one side of the ball, setting up reverse swing earlier than usual.
- Wind direction across the ground can add or subtract several degrees of lateral movement depending on whether it’s blowing with or against the seam.
When none of that cooperates and the ball simply won’t move, fall back on discipline rather than forcing the issue: tight line and length, seam-up bowling that asks questions off the pitch instead of through the air, and patience until conditions change.
Drills and a 30 to 45 minute net session to build swing from scratch
Learning to swing the ball reliably is a stepwise process, and trying to rush straight to full pace with a new grip is the most common reason bowlers give up on a technique change too early.
Structure your session in four phases:
- Warm-up (5 to 10 minutes): dynamic stretching, shoulder mobility work and a handful of gentle throw-downs focusing purely on grip and seam position, no pace involved.
- Static and short run-up reps (10 minutes): bowl from a standing position and then a four to six step run-up, checking seam angle on every ball before adding any pace.
- Full run-up targeted reps (15 to 20 minutes): bowl at full pace and full run-up, alternating between outswing and inswing grips in blocks of six deliveries, with a coach or phone camera checking seam stability on each one.
- Overload and cool-down (5 minutes): a short burst of deliveries aimed at a specific length cue, followed by light stretching to manage shoulder and elbow load.
Within that structure, rotate through these specific drills:
- Seam-upright release: ten deliveries focused only on landing the seam vertically at release, checked by video, pace irrelevant.
- Backspin control: bowl into a single stump or cone from short range, aiming to see consistent backward rotation rather than side-on wobble.
- Alternate seam-angle reps: six balls angled for outswing, six for inswing, checking on camera whether the seam actually matches your intended grip.
- Contrast swing reps: once comfortable, practise switching between an outswing and an inswing grip within the same over to build the disguise that makes contrast swing effective in a match.
- Late swing reps: deliberately take a touch of pace off while pitching fuller, testing whether the ball holds its line longer before deviating, consistent with the approach to generating late swing described by QUT researchers.
Pro Tip: Film every block of six deliveries from side-on at the highest frame rate your phone allows, then watch them back immediately rather than waiting until after the session, so the feedback loop stays tight.
Radar and video turn a practice session from guesswork into something measurable. A basic radar speed gun gives you release speed for every delivery, which matters because small, deliberate reductions in pace are part of how late swing is generated. Slow-motion video, reviewed at 120 frames per second or higher, lets you check three things on repeat: whether the seam stays within a few degrees of vertical through the air, whether your wrist is rotating the way you intend at release, and whether your front arm and hip alignment stay consistent over a full over rather than drifting as fatigue sets in.
Using radar guns and frame-by-frame video review can help compare numbers across sessions instead of relying on how a delivery felt, which removes a lot of the guesswork from technique change. Junior bowlers in particular benefit from structured drill progressions; our cricket drills for junior players guide covers age-appropriate warm-ups and bowling progressions that pair well with the session structure above.
Common mistakes and quick fixes when the ball won’t swing
Most swing problems trace back to one of a small number of faults, and working through them in order saves a lot of wasted overs.
- Seam wobble: if the seam rotates visibly in flight, go back to the seam-check drop drill and isolate wrist position before adding pace back in.
- Unintended sidespin: uneven finger pressure is the usual culprit, so try the finger-pressure isolation drill to find which finger is interfering.
- Variable release point: if your seam angle changes ball to ball despite a good grip, the fault is often in your run-up rhythm or front-arm timing rather than your hand, so revisit the mirror check drill.
- Over-pace: bowling as fast as possible often sacrifices the seam stability needed for swing, so deliberately backing off 5 to 10% of your pace while focusing on seam position can bring movement back, particularly for late swing.
- Rushed front arm: a front arm that collapses early throws off shoulder alignment at release, so isolate it with slow, exaggerated front-arm pulls in a walk-through run-up before returning to full pace.
A short retraining block, even five minutes of one-step release drills or throw-and-catch seam checks before a full net session, tends to fix these faults faster than trying to correct them mid-over under match pressure.
Measuring progress with video, radar and coaching feedback
Technique work without measurement tends to stall, because it’s hard to tell whether a change is actually working or just feels different. Four things are worth tracking over time.
- Release speed: recorded with a radar gun, this tells you whether pace changes you’re making for late swing are deliberate and consistent rather than accidental.
- Seam angle and wobble: checked via slow-motion video, this is the clearest indicator of whether your grip and wrist changes are translating into a stable release.
- Pronation and supination at release: reviewing footage frame by frame around the point of release shows whether small forearm rotations are happening the way you intend.
- Lateral deviation at the pitch: measured roughly by where the ball pitches relative to its line at release, this is the real-world outcome you’re chasing.
A reasonable milestone structure is a few weeks of grip and seam drills at reduced pace, followed by a few weeks reintroducing full pace while monitoring seam stability on video, then moving to match-simulation overs once seam angle holds steady across a full spell. Throughout, keep an eye on bowling load: a sharp increase in overs or intensity while changing technique is a common contributor to shoulder and elbow strain, so build volume gradually and prioritise recovery between sessions.
Body position and balance during delivery
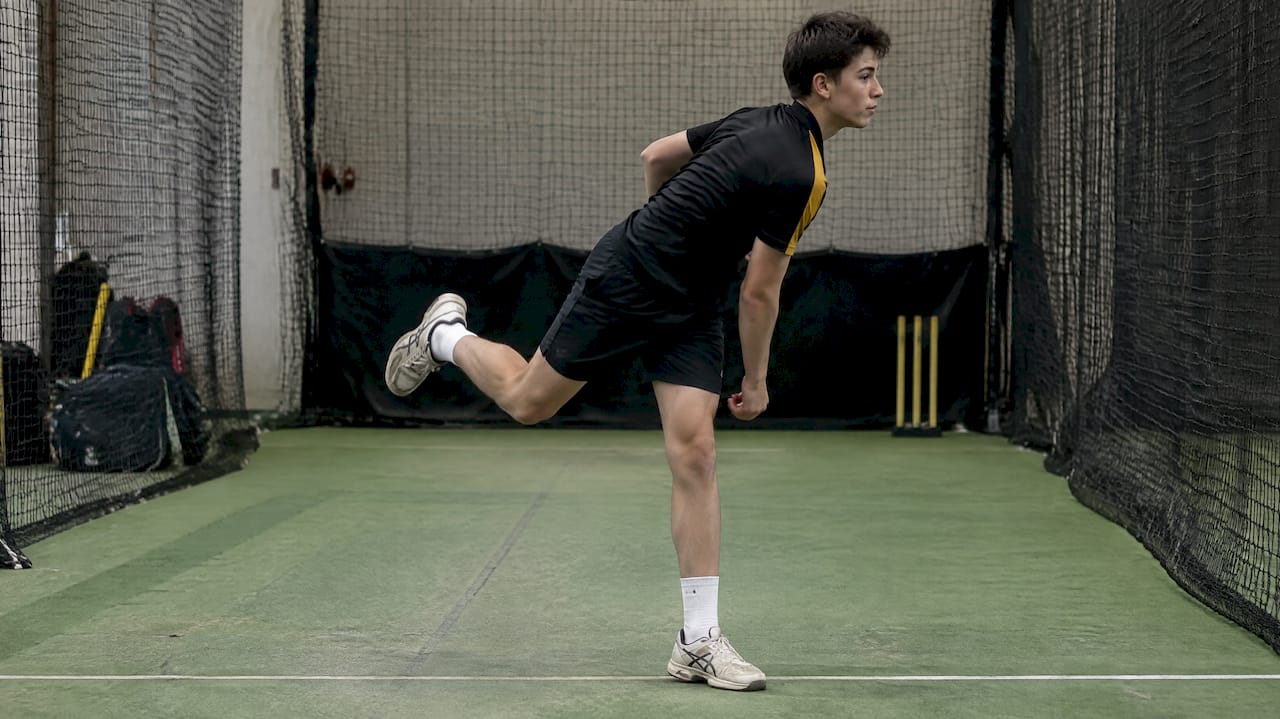
Balance at the crease is what allows every other part of the action, grip, wrist, arm path, to actually translate into a stable release. A front leg that buckles on landing, or a head that falls away towards point or fine leg, throws off the hip and shoulder sequence that keeps the seam presenting the same face to the air on every delivery.
The core checkpoint is your front foot landing roughly in line with your back foot and your head staying over or just in front of that front knee at the point of release. Leaning away from the stumps, a common habit under fatigue, opens the chest too early and tends to drag the arm across the body rather than through a clean, over-the-top path.
A simple way to check this without equipment is to freeze-frame video at front foot landing and again at release, looking for a straight line from back foot through front knee to head. If that line bends sharply in either direction, balance is probably costing you more swing than your grip ever could. Strength and stability work through the front leg, simple step-and-hold drills or single-leg balance exercises, can help bowlers who consistently collapse under load, particularly late in a spell when fatigue sets in and technique tends to break down first at the base rather than in the hands.
Release point timing and follow-through techniques
Timing the release correctly, neither too early nor too late in the arm’s arc, has a direct bearing on seam angle, which in turn determines how much swing survives the trip down the pitch. A release that happens too early tends to send the ball up and across, flattening the seam angle, while a release that’s held too long drags the wrist out of position and often introduces sidespin.
The clearest external cue for timing is your front arm. Pulling it down hard and early towards your hip, rather than letting it drift, opens the shoulders at the right moment and gives your bowling arm a clean, late whip through release. Bowlers who time this well tend to describe the release as happening almost by itself once the front arm action is grooved.
Follow-through matters more than it’s often given credit for, not because it changes the ball after release, but because a follow-through that’s cut short is usually a symptom of deceleration happening too early in the action, which bleeds pace and consistency from the delivery before the ball even leaves the hand. A full, balanced follow-through that carries your weight down the pitch, rather than pulling off to one side, is a reasonable proxy for a well-sequenced action overall. Filming your follow-through alongside your release point gives a fuller picture than checking either one in isolation.
Using pace and length variations to complement your swing
Swing alone becomes easier to read the longer a batter faces it, so varying pace and length within a spell is what keeps movement genuinely dangerous rather than just visible. A bowler who swings the ball beautifully at one unchanging pace and length becomes predictable within a handful of overs at club level and faster again against better players.
Length is the simplest lever to pull. Pitching fuller tends to help late swing find more time to work, as the QUT research on backspin and release velocity suggests, while a slightly shorter length with the new ball can still generate conventional swing while keeping the batter further from committing to a shot. Mixing these lengths within an over, rather than settling into one, forces a batter to reset their judgement on where the ball will pitch every single delivery.
Pace variation works alongside this rather than separately from it. A small, deliberate reduction in pace paired with fuller length is one of the more reliable ways to generate late swing, and the change in pace alone can be enough to beat a batter’s timing even when the ball doesn’t move much. The key is disguise: a pace change that’s visible in your run-up or arm speed gives the batter time to adjust, so the variation needs to come from release mechanics rather than an obviously different approach to the crease.
Mental approach and visualisation for consistent swing bowling
Swing bowling rewards patience more than most other bowling styles, because conditions, ball condition and your own rhythm all shift across a spell, and chasing movement that isn’t available on a given ball usually makes things worse rather than better. Accepting that some overs simply won’t swing, and bowling a disciplined line and length through them, keeps your technique intact for when conditions do turn in your favour.
Visualisation before you reach your mark is worth building into a routine. Picture the seam position you want at release, the line you’re aiming for, and the shape you expect the ball to take, before every single delivery rather than only when things are going well. This kind of rehearsal helps lock in the specific technical cues, wrist position, front arm, seam angle, that you’ve been drilling in the nets, rather than letting your action drift under match pressure.
Confidence in swing bowling tends to come from trusting a process you’ve already tested in training rather than from any single magic cue in the middle of a match. A bowler who has run through the drills, checked seam stability on video and knows what a reduced-pace, fuller-length delivery feels like is far better placed to adapt mid-spell than one relying purely on instinct. Treat a wayward over as information about conditions or fatigue, not a sign that your technique has broken down, and reset to your basic cues rather than trying something untested under pressure.
Turning these tips into measurable improvement
Reading about seam angles and backspin only gets a bowler so far. Translating it into a reliable skill takes repeated reps with honest feedback, which is exactly what our six indoor lanes at Kings Cricket Academy are set up for: radar speed guns and HD video analysis on every lane mean you can check release speed and seam stability on the spot rather than guessing from how a delivery felt.
Our 1-on-1 Coaching sessions work through grip, wrist position and run-up alignment with a coach watching every rep, and our dedicated Fast Bowling Coaching programs focus specifically on the sequencing issues, run-up rhythm, arm path and release timing that most often separate a bowler who swings the ball occasionally from one who does it on demand. Junior bowlers working on these same fundamentals can join our structured Junior Cricket Coaching program, built around age-appropriate drill progressions.
Running your training sessions indoors ensures weather never cancels a session, which matters when you’re trying to build a technique change over consecutive weeks rather than whenever the rain clears. For bowlers wanting regular net access to run the drills in this guide, our 6-visit Plan and 10-visit Plan both give you repeated time on a lane with a bowling machine or sidearm setup to groove seam position before taking it into full pace overs. Book a lane or a coaching session through our main booking page to get started.
FAQ
What is the 3-6-9 rule in bowling?
The 3-6-9 rule isn’t a standard, sourced coaching framework for cricket swing bowling, and definitions circulating online vary without a clear authoritative origin. Rather than relying on it, focus on the fundamentals covered in this guide: seam stability, grip consistency and a repeatable release platform.
Which pitch is best for swing bowling?
A hard, grassy pitch that keeps the ball’s shine intact tends to favour conventional swing, particularly early in an innings and under overcast skies. A drier, more abrasive surface accelerates wear on one side of the ball, which sets up conditions for reverse swing later in the match.
How do I improve my run-up for bowling?
Build a run-up with a consistent number of strides and a gradual build in pace rather than a rushed sprint into the crease, since an uneven run-up is a common cause of a collapsed front leg and an inconsistent release point. Filming your run-up from side-on and checking stride length and rhythm over several deliveries helps identify where it breaks down.
What are the three C’s of bowling?
There’s no single, widely agreed “three C’s” framework backed by coaching research for swing bowling specifically. The fundamentals that consistently show up across coaching sources are control of the seam, a consistent release point, and balance through the crease, which are the pillars this guide builds its drills around.
How much does coaching cost at Kings Cricket Academy?
Lane and machine hire at Kings Cricket Academy ranges from $39 to $60 AUD per hour depending on the setup, with 6 visit and 10 visit plans available at $300 AUD and $450 AUD respectively as one-off purchases. Pricing for 1-on-1 Coaching, Fast Bowling Coaching and Junior Cricket Coaching is available on request through our coaching pages.
Sources
- Impart backspin and pitch the ball up: strategies cricket fast bowlers can employ to generate late swing | QUT ePrints
- Bowler and coach experiential knowledge of new ball swing bowling in elite cricket | PMC
- A review and reassessment of the aerodynamics of cricket ball swing | Flow | Cambridge Core
Recommended
- Cricket Drills For Junior Players: Batting, Bowling & Fielding
- How To Read The Field: Finding Gaps As A Batter
- Cricket Batting Drills On 1 In Sydney: Improve Faster
- Cricket Training Tips